HOW TO: Nvidia graphics driver can not find compatible graphics hardware
Facing a problem like “Nvidia graphics driver can not find compatible graphics hardware“
, well Many people have been into this kind of problem. It actually
occurs when you might have reinstalled Windows and installing the Nvidia
driver right after you have installed the Intel HD Graphics or you just
want to update your Nvidia driver. Whenever you try to install the
Nvidia driver, it shows that it is unable to find a compatible graphics
hardware.Now,
most of the users try re installing Windows, Intel HD or Nvidia, trying
out different versions, but this gets pretty lengthy and does not
guarantee that the problem will be resolved. And downloading the
different versions, that’s a sort of irritating job. So, today I will
show you how to do overcome this issue, and successfully install the
Nvidia graphics driver without downloading anything else. The process is
a little tricky one, but its sure that it will not be devastating if
you make any mistake. so here is How to : fix the problem of “Nvidia graphics driver can not find compatible graphics hardware“
Step 1:
1) Get your device ID: click on CONTROL PANEL, then CLICK on SYSTEM, then CLICK on DEVICE MANAGER
2) Under Other Devices/ (or if your video card already has a driver under Display Adapter) click on Video Adapter
3) Click on Details, Device Instance Id should already be selected
4) You will see something similar to this: PCI\VEN_10DE&DEV_0DE3&SUBSYS_14471043&REV_A1\4&1595E8D4&0&0008
PCI\VEN_10DE&DEV_0DD1&SUBSYS_20421043&REV_A1\ 4&30DE1B This single line has all the details about your specific video card maker, chipset and model VEN_10DE means that the Vendor is 10DE, which is the Vendor ID for NVIDIA
DEV_0DE3 means that the Chipset is 0DE3, which is the Chipset ID for GT635M
SUBSYS_20421043 tells about the Specific Model GT635M in the Asus K55VJ laptop
Step 2:
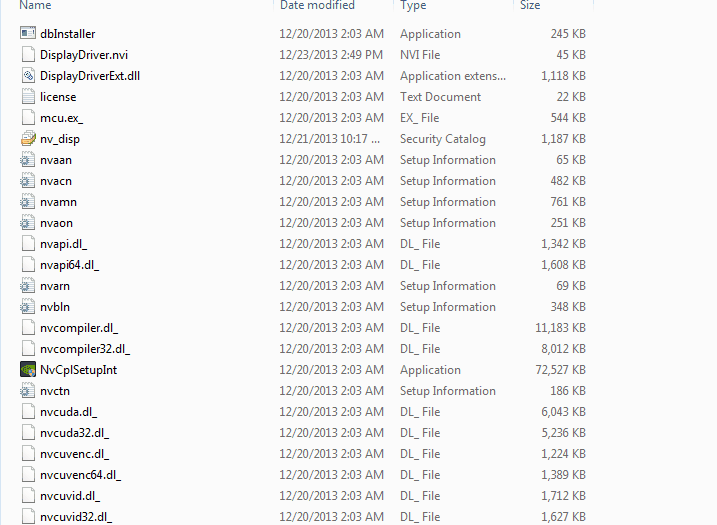
1) When you have tried to install and
it showed failed, you must have noticed that the files are extracted to
the installation directory. The default directory should be C:\NVIDIA\DisplayDriver\340.43\Win8_WinVista_Win7_64\International\Display.Driver 2) Locate the INF files there of the type: nvaa.inf
nvac.inf
nvam.inf
nvao.inf
nvbl.inf and so on.
3) Pick
any one of them (I picked nvam.inf) and make a backup copy then open
the original in NOTEPAD or your favourite text editor, like Notepad++. 4) Now scroll down, until you see this Scroll down until you see lines like:
%NVIDIA_DEV.0407.06% = Section005, PCI\VEN_10DE&DEV_0407&SUBSYS_3D7B17AA 5) Now scroll down to the section that is similar to your chipset / DEV number [DO IT CAREFULLY]
1) Save the file.
2) Now run setup.exe from the installation directory, and this time you should be able to successfully install the Nvidia driver. NOTE: DO NOT RUN THE DOWNALOADED SETUP FILE. IT WILL OVER WRITE EVERYTHING IF YOU HAVE DONE SO FAR.
3) Install the driver, and once it has been installed just restart your laptop and you are ready to play high end games again.
Wi-Fi is the name of a popular wireless networking technology that uses radio waves to provide wireless high-speed Internet andnetwork connections. A common misconception is that the term Wi-Fi is short for "wireless fidelity," however this is not the case. Wi-Fi is simply a trademarked pharse that means IEEE 802.11x.
The Wi-Fi Alliance
The Wi-Fi Alliance, the organization that owns the Wi-Fi (registered trademark) term specifically defines Wi-Fi as any "wireless local area network (WLAN) products that are based on the Institute of Electrical and Electronics Engineers' (IEEE) 802.11 standards."
Initially, Wi-Fi was used in place of only the 2.4GHz 802.11bstandard, however the Wi-Fi Alliance has expanded the generic use of the Wi-Fi term to include any type of network or WLAN product based on any of the 802.11 standards, including 802.11b, 802.11a, dual-band, and so on, in an attempt to stop confusion about wireless LANinteroperability.
How Wi-Fi Works
Wi-Fi works with no physical wired connection between sender and receiver by using radio frequency (RF) technology, a frequency within the electromagnetic spectrum associated with radio wave propagation. When an RF current is supplied to an antenna, an electromagnetic field is created that then is able to propagate through space.
The cornerstone of any wireless network is an access point (AP). The primary job of an access point is to broadcast a wireless signal that computers can detect and "tune" into. In order to connect to an access point and join a wireless network, computers and devices must be equipped with wireless network adapters
Wi-Fi Support
Wi-Fi is supported by many applications and devices including video game consoles, home networks, PDAs,mobile phones, major operating systems, and other types of consumer electronics. Any products that are tested and approved as "Wi-Fi Certified" (a registered trademark) by the Wi-Fi Alliance are certified asinteroperable with each other, even if they are from different manufacturers. For example, a user with a Wi-Fi Certified product can use any brand of access point with any other brand of client hardware that also is also "Wi-Fi Certified". Products that pass this certification are required to carry an identifying seal on their packaging that states "Wi-Fi Certified" and indicates the radio frequency band used (2.5GHz for 802.11b, 802.11g, or 802.11n, and 5GHz for 802.11a).
Your Wi-Fi network is your conveniently wireless gateway to the internet, and since you're not keen on sharing your connection with any old hooligan who happens to be walking past your home, you secure your network with a password, right? Knowing, as you might, how easy it is to crack a WEP password, you probably secure your network using the more bulletproof WPA security protocol.P
Here's the bad news: A new, free, open-source tool called Reaver exploits a security hole in wireless routers and can crack most routers' current passwords with relative ease. Here's how to crack a WPA or WPA2 password, step by step, with Reaver—and how to protect your network against Reaver attacks. P
In the first section of this post, I'll walk through the steps required to crack a WPA password using Reaver. You can follow along with either the video or the text below. After that, I'll explain how Reaver works, and what you can do to protect your network against Reaver attacks.P
Your Wi-Fi network is your conveniently wireless gateway to the internet, and since you're not keen on sharing your connection with any old hooligan who happens to be walking past your home, you secure your network with a password, right? Knowing, as you might, how easy it is to crack a WEP password, you probably secure your network using the more bulletproof WPA security protocol.P
Here's the bad news: A new, free, open-source tool called Reaver exploits a security hole in wireless routers and can crack most routers' current passwords with relative ease. Here's how to crack a WPA or WPA2 password, step by step, with Reaver—and how to protect your network against Reaver attacks. P
In the first section of this post, I'll walk through the steps required to crack a WPA password using Reaver. You can follow along with either the video or the text below. After that, I'll explain how Reaver works, and what you can do to protect your network against Reaver attacks.
External Graphics Card? What is this? An external graphics card is a graphics card that operates outside of a computer (usually a laptop) to boost gaming performance (or other GPU related activities). How is this possible?A company by the name of BPLUS (www.hwtools.net) produces many adapters to allow the use of desktop PCIe cards on a system not intended for it. The PE4L v2.1b is currently the best solution for most people, providing a 1x desktop PCIe slot connected either by ExpressCard, or mini pcie which is usually used for WIFI and BlueTooth cards.
What are the reasons I would want to create an External GPU setup? -Get better performance out of an existing laptop without getting a whole new laptop or desktop. -Have better gaming performance per £ in a new setup. A second hand Lenovo X220, PE4L, and GeForce 650Ti will beat any laptop in that price range. -Add output capabilities to a laptop which does not support them, for example a 2560x1440 display, or driving many (4+) displays in a multi-monitor or mirrored setup. -A unified setup. Use a small (12.5) laptop on the road/at uni/etc, and when returning home, dock to your External GPU to provide desktop-level gaming performance whilst not having to install all of your programs and games twice, and not having to worry about keeping your documents in sync. A ultraportable in the lecture theatre can become a gaming machine in your room.
What are the disadvantages of an External GPU? -The GPU requires a source of power. For GPU's less than 203W, an XBox 360 power supply can be used as a cheap solution. With any GPU with a TDP over 203W an appropriate ATX PSU would be needed. -The GPU is only connected via a 1x PCIe express link, as opposed to a 16x link in a standard desktop. This reduces performance, however some games are more affected than others by this loss of bandwidth. This is somewhat mitigated if the system has a select range of Intel cards (HD Graphics), and the External GPU is NVidia Fermi or greater. -Some laptops cannot fit an External GPU into the PCIe address space. This can often be sorted with the use of a software known as Setup 1.x, however this increases the faff of setting up the GPU. It is considered that any laptop which already features two graphics cards will be tricky to use an External Graphics Card without fidling. What is the ideal setup hardware wise? -A Laptop with an Intel Core I Series processor (any generation) and an Expresscard 2.0 slot. -A NVidia Fermi or later GPU. The reason for this is upon detecting a 1x PCIe link, the NVidia driver firstly engages PCIe data compression, increasing performance from anything between 20-333%, and also lets the External Graphics Card drive the internal laptop display, as the functionality mirrors Optimus Switchable Graphics. Whilst there are ways to drive the internal LCD with an AMD/ATI card, PCIe compression is not present, thus causing a larger potential bottleneck.
-If starting fresh, a Lenovo X220 makes the ideal External Graphics Card companion, as Lenovo specifically changed the BIOS to make external GPUs work as close to plug-and-play as possible. Do any Facepunchers use an External GPU?Currently, I am the only user I know of who uses an External GPU. This is my current setup (Lenovo X220T, PE4L v2.1b, XBox 360 203W PSU, 650Ti, and generic Maplins project box).
If you own a External Graphics Card, are considering making one, or are just curious, feel free to discuss here, and I will try and help answer any questions.
What Is the Difference Between DDR2, DDR3, DDR4 & DDR5 RAM?
By Daniosn vazhappilly
While the type of memory won't matter much for a typical business computer, if your business in engaged in computationally intensive tasks, the performance of your RAM can make a big difference in how fast your computers run. Financial modeling, engineering, and graphics rendering are all business applications that require more RAM than the average, off-the-shelf computer provides. While higher-numbered double-data rate memory is usually faster than lower-numbered versions, there can be some complexities that make this less predictable than you might expect.
SDRAM
To understand the basics of different types of DDR RAM, a basic understanding of how the Synchronous Direct RAM technology on which it is based is helpful. SDRAM is designed to read and write data in conjunction with a clock, which synchronizes the transfer of the data, hence the name. For example, SDRAM operating at a 400MHz clock would be able to interface with the computer and share a chunk of data 400 million times per second.
DDR
The first double data rate RAM modules worked just like SDRAM but with one key difference: Instead of transferring one block of data per clock cycle, they could transfer two. A DDR module running at 400 MHz could theoretically transfer twice as much data as a regular SDRAM module. The downside to this technology was that if a computer missed a clock cycle and didn't transfer memory, it would miss out on twice as much data as with a regular SDRAM module.
After the initial generation of DDR, memory manufacturers continued to advance the technology. The numbers associated with DDR, such as DDR2 or DDR4, refer to the generation of the DDR technology used in the memory modules. Newer generations of DDR memory are typically faster than older generations. If you can find two modules with the same speed rating, though, they will usually be able to transfer data at the same rate. For instance, DDR2-800 and DDR3-800 memories both run at 400 MHz and can theoretically transfer 6,400 MB/sec of data. The "800" in their names refers to their 400MHz speed multiplied by two for their double data rate.
Requirements
There are a couple of requirements that will allow you to use a particular type of memory in your computer. First, your CPU and your motherboard's chipset will need to support both the speed and the manner in which a given type of DDR memory works. Secondly, you must have slots on your mother board that are compatible with your chosen type of memory. Each type of DDR RAM is physically incompatible with the other types. This prevents you from plugging the wrong type of module into your motherboard and damaging it or your computer.
The State of the Art
As of the publication date in May of 2013, DDR3 memory is widely available in both desktop and notebook computers. DDR4 memory was displayed in prototype form at the beginning of 2013, and DDR5 is coming, but is not yet available for system memory. DDR5 technology is, however, available in a special type of memory used for graphics cards. Referred to as GDDR5 memory, it has much higher bandwidth than DDR3 and can transfer more data for better graphical rendering.
Upgrading Your Computer
Choosing memory to upgrade your computer is actually a simpler process than it seems. Since any given computer will only be compatible with a single type of DDR memory, buy the type that works in your computer. If you aren't sure of the exact speed your computer uses, buy the fastest memory available. That way, you can be sure that it'll be fast enough to keep up.
DDR1 Specifications DDR-DIM (Dual Data Price DIMM or DDR DIMM), or most popularly just plain DDR. Twice Data Rate interfaces supply two information transfers for every differential clock. The data becomes authorized when the CK goes high [the + side], and also /CK goes minimal [the - side]. DDR1 utilizes the JEDEC regular for Double Date Price [DDR I] SDRAM. Like all DDR Random access memory it is offered as signed up or un-buffered. Listed DIMMs are generally called FB-DIMMs and have his or her address as well as control traces buffered in order to reduce signal packing. FB-DIMMs are considerably more expensive than un-buffered DIMMs and are generally available to server use. There are not many enthusiast/prosumer/gamers utilizing FB-DIMMs in their CPU's. Un-buffered DIMMs don't characteristic address traces and control line loading, so they charge quite a bit much less. However, they could be system-loading limited and are thus usually restricted inside the number that can be fitted upon one method. You'll find that nearly all un-buffered DIMMs these days are only able to be set up on one motherboard to a maximum of 4 x 1GB. Buffered or registered DIMMs don't have these kinds of limitations along with server snowboards can support 8 a 1GB, 16 x 1GB or more. A unique and generally unknown aspect of un-buffered DDR DIMMs is that they can operate one clock cycle faster and then FB-DIMMs.
DDR2 Specifications DDR2 storage is the second generation within DDR memory. DDR2 starts with a velocity level of 400MHz because the lowest accessible while the 400MHz speed is actually the very best speed for DDR1. Therefore, DDR2 covers where DDR1 results in off. It is a bit strange nevertheless due to various latencies a 400MHz DDR1 will outperform a 400MHz DDR2, but the advantage returns in order to DDR2 as soon as the speed reaches the next step 532MHz, which DDR1 can not reach.
DDR3 Features DDR3 is the next generation inside DDR memory. DDR3 starts off with a most affordable capacity amount of 800Mbps and climbs up to 1600Mbps using bus rate as high as 2000MHz. Greater performance using lower electrical power consumption is the major gain, since functioning voltage is merely 1.5V with regard to DDR3 compared to One particular.8V for DDR2. Reduced heat can be generated, meaning that systems will certainly run colder. Ultimately the newest technology will result in higher capacity modules: As much as 8GB quests (Using 4Gb Chips) to help reduce server/workstation system fees.
Transfer Rates Another distress is that Random access memory is mostly known in PC-number, out of your tender are the Exchange Rates for the various DDRs:
DDR1 Exchange Rate DDR SDRAM: Increase Data Price SDRAM (DDR200, DDR266, DDR333 are standard) PC1600 (DDR-200 SDRAM); Clock Speed: 100MHz, Data Fee: 200MHz, Throughput 1600MB/s PC2100 (DDR-266 SDRAM); Clock Velocity: 133MHz, Data Fee: 266MHz, Throughput 2100MB/s PC2400 (DDR-300 SDRAM); Clock Velocity: 150MHz, Data Charge: 300MHz, Throughput 2400MB/s PC2700 (DDR-333 SDRAM); Clock Speed: 166MHz, Data Fee: 333MHz, Throughput 2600MB/s PC3000 (DDR-366 SDRAM); Clock Velocity: 183MHz, Data Price: 366MHz, Throughput 2900MB/s PC3200 (DDR-400 SDRAM); Clock Velocity: 200MHz, Data Price: 400MHz, Throughput 3200MB/s
DDR2 Transfer Charge DDR2 SDRAM: Double Data Rate SDRAM The second (Quad Edge Clock Rate, One.8v signaling), Second Technology PC2-3200 (DDR2-400 SDRAM); Clock Speed: 100MHz, Data Rate: 400MHz, Throughput 3200MB/s PC2-4300 (DDR2-533 SDRAM); Clock Rate: 133MHz, Data Fee: 532MHz, Throughput 4300MB/s PC2-5300 (DDR2-667 SDRAM); Clock Pace: 167MHz, Data Charge: 667MHz, Throughput 5300MB/s PC2-5400 (DDR2-675 SDRAM); Clock Pace: 167MHz, Data Price: 667MHz, Throughput 5400MB/s PC2-6400 (DDR2-800 SDRAM); Clock Speed: 200MHz, Data Rate: 800MHz, Throughput 6400MB/s
DDR3 Transfer Rate DDR3 SDRAM: Double Data Rate SDRAM III (Quad Edge Wall clock Rate, A single.5v signaling), Third Technology PC3-6400 (DDR3-800 SDRAM); Clock Pace: 100MHz, Data Price: 800MHz, Throughput 6.40GB/s PC3-8500 (DDR3-1066 SDRAM); Wall clock Speed: 133MHz, Info Rate: 1066MHz, Throughput Eight.53GB/s PC3-10600 (DDR3-1333 SDRAM); Clock Velocity: 166MHz, Data Fee: 1333MHz, Throughput 10.67GB/s PC3-12800 (DDR3-1600 SDRAM); Time clock Speed: 200MHz, Info Rate: 1600MHz, Throughput Twelve.80GB/s Now it will likely be really hard to list out down which in turn RAM best fits which mother board. Before buying the particular RAM you must research your CPU manufacturer's Ram memory recommendations and fit that exact form of DDR in it. You would be just as irrational in using the PC3-12800 DDR3-1600 with an AMD Sempron 2800+ while you would be to weight down your current Intel QX6800 using a PC1600 DDR-200. Every CPU/chipset combination has its proper DDR fit, and you need to find out just what they are as well as stick to these people. If you 1 a slower than encouraged DDR to your system will eliminate critical Ram memory functions and may slow your whole body. >>>>>>>>>>>>>>>>>>>>>THANK YOU FOR VIEWING<<<<<<<<<<<<<<<
Whether you’re building a basic desktop or a power-house gaming PC, choosing the right PSU is an important decision.
Corsair's just released it's shiny new RM range of power supplies, so it's as good a time as any to look at how to choose the right PSU for you...
When it comes to PC building, there are some really exciting decisions that are going to have an immediate effect on your system. The stars of the show are usually the processor and the video card, with the motherboard a close second; people agonise over what part to choose in order to get the most of out of their new build.
Compared to these attractive pieces of kit, the humble power supply – just as essential, but a little on the boring side – can often get overlooked in terms of research and impact.
However, choosing the right PSU can have a massive impact on your next build – and many builds after, too, as this is one part that, like monitors, can often carry over from one PC to the next. So you should really make the right choice first time. You’ll end up with better performance, and a component that will last through multiple upgrades and builds. Here’s our advice on what to look for when you’re in the market for more power.
Form factor The ATX form factor is very much the industry standard these days, and while that means its width and height, not to mention mounting-screw placement, are locked in – and compatible with all ATX case designs – the form factor can vary in depth. If you’ve got a full-size desktop tower, you’re probably not going to have to worry about room, but smaller cases will often require a shorter PSU design, so as to leave room for neat cabling. In some shorter case designs, longer PSUs will even get in the way of optical drive cables.
The ‘standard’ drive depth is around six inches deep, though supplies with a higher wattage will be an inch or two deeper. Always make sure you know the room you’ll be working with in any build, and choose an appropriately-sized PSU.
Fan placement and size is something you’ll want to pay attention to as well. Smaller fans will have to spin faster to push more hot air out of the PSU, and will therefore be noisier. Larger fans, up to 140mm in diameter, spin slower and are therefore quieter.
If you want a quiet system, this is definitely important, but larger fans usually vent into your PC’s case. You’ll need to make sure there’s room enough for sufficient exhausting, as well as make sure that the cooling within your case are up to the task of dealing with the extra hot air.
Power to the people Well, components, actually.
You’ll want to choose a PSU that’s up to the task of powering all your components, with enough headroom to take care of any future upgrades, though with PC parts becoming more and more efficient, this is less of a concern these days. One of the best places to start is with the excellent online calculator at Extreme Outervision. Here you can list the parts of your particular build, including whether or not you intend to overclock any components. You’ll then end up with an overall wattage you should be aiming for. Alternately, various PSU makers offer similar services, such as Corsair’s PSU Finder; they may be simpler, but are often quite adequate for most needs.
If you’re running powerful parts, you’ll also need a basic understanding of the individual ‘rails’ within your PSU. Some designs offer a single rail, others multiple rails, with different amperages on each. Your video card specs, if it’s powerful enough, will often call for a recommended power supply wattage that can help you choose the right PSU. If you have a powerful CPU and video card, you’ll want a PSU with dedicated rails for these parts.
Cabling It’s up to you whether you want a PSU with fixed or modular cabling, as modular PSUs – with the ability to use only the cables you need, like Corsair’s RM series, pictured – are generally more expensive. But if you’ve got the cash in your budget, we’d suggest going modular.
It’s not only neater and easier to install a PSU with less cabling, but ultimately this will assist in keeping your PC running cool in the long run, and provide less surfaces for dust and other cruft to accumulate on.
You’ll also want to make sure you’ve got PCI-E connectors for any juice-hungry video cards you’re using, especially if you’re running any kind of multi-GPU rig. In the latter case, choosing a PSU that is SLI Ready or CrossFire Certified is a safe bet. Even then, check that you’ll be getting the right number of 4-, 6- or 8-pin PCI-E connectors.
You do not want to get your PSU home to find out you can’t hook up your precious video cards.
Lastly, while even lower-specced PSUs tend to come with a mess of SATA and Molex connectors for components like drives, if you’re running anything more complex like front-bay fan monitors or water-cooling loops, just make sure your PSU has enough for your needs.
Efficiency The more efficient your PSU, the less noise it will make, the less power it will draw, and the less it will cost when you open your energy bill. PSUs are rated at five levels – 80 Plus, 80 Plus Bronze, 80 Plus Silver, 80 Plus Gold and 80 Plus Platinum, with Platinum being most efficient. There’s not a huge difference, but if you’re PC is on a lot, or you’re building multiple, powerful systems, you’ll want to go with at least a Gold rating.
We’d definitely suggest not taking any cheap option that isn’t properly rated – it’s just not worth the risk.
Power supplies are a frequently misunderstood—and overlooked—PC component. Many users choose a power supply based on total wattage alone, assuming that higher is always synonymous with better. Others pay no attention to their PSU selection at all, and settle for whatever abomination arrived with their machine. But considering how important a good power supply is to a system's stability and long-term reliability, it’s a shame that PSUs get so little attention in comparison to sexier components like graphics cards and SSDs.
It doesn’t help that the power-supply market is awash with products from unscrupulous manufacturers that use substandard components and overstate the hardware’s capabilities. Indeed, the abundance of PSU-related misinformation and deception in the marketplace would be comical if it weren’t so harmful to consumers. But finding a solid, efficient power supply is possible if you arm yourself with the right knowledge. We can help.
Choosing a power supply
Devote as much thought to your power supply as you do your PC's processor.
There is no single, universal rule for selecting a high-quality power supply. Nevertheless, various indicators provide circumstantial evidence of PSU quality, and some guidelines are generally helpful.
First, always buy a power supply from a reputable manufacturer, and look for reviews of it before you buy. Avoid cheap, generic power supplies, which tend to be substandard. Look for reputable brands that offer solid warranties and support. Corsair, Seasonic, and Antec are three manufacturers with reputations for producing high-quality power supplies, though even they may offer a few duds among all the studs. Do your homework!
Larger, heavier units are preferable to puny, lightweight models. Higher-quality power supplies almost always use bigger and better capacitors, chokes, and other internal components, and they come outfitted with larger heatsinks for superior heat dissipation—all of which translates into more weight. Larger cooling fans, which typically move more air while making less noise than smaller fans, are another plus.
SILVERSTONEA 6+2 pin connector.
Of course, you should also check the PSU's connectors to confirm the unit is compatible with your particular system. The term 20+4 pin refers to a connector that can function as either a 20-pin connector or a 24-pin connector. In the 6+2 pin connector shown at right, you can snap two of the pins in the connector on or off to suit your needs.
The vast majority of consumer PCs use standard ATX power supplies. Smaller units and units specially designed for enterprise and server applications are also available; but for common desktop systems, ATX power supplies are it.
When searching for a power supply, keep your eyes on three crucial features: power output, rails, and efficiency. Other specifications and features are important, too, but these three directly affect the PSU’s performance.
All about output
Manufacturers usually list their power supplies' output in watts. A higher-watt PSU can supply more power. Desktop power supplies have a power output rating of from 200 watts to 1800 watts (for ultra-high-end, enthusiast-class products). Wattage ratings higher than that would exceed the capabilities of a typical 15-ampere electrical outlet. The important number here is the one for sustained or continuous power, not the one for peak power. Most power supplies can operate at peak power for only brief periods.
Ideally your unit will delivers plenty of power to your components and offers some extra headroom in case you want to attach additional components later. Most power supplies hit their peak efficiency levels with loads in the range of 40 to 80 percent. Building to about 50 to 60 percent of a PSU's capacity is advisable to achieve maximum efficiency and yet leave room for future expansion.
A glimpse inside a PSU.
For example, if the maximum power or combined TDP (total design power) of your system’s present components is 300 watts, a 600-watt PSU would be a good fit. In a high-end system loaded with components that may peak collectively at 700 watts, a 1200-watt PSU would work well. You can get by with lower-capacity units if you don’t think you’ll ever need to expand your system, but if you can afford it, choosing a higher-capacity PSU is a better bet.
Outervision and Thermaltake's handy-dandy PSU wattage calculator invites you to input your build components in exacting detail—right down to CPU overclocking voltages and specific water-cooling components—and then spits out a ballpark power-supply wattage for your system.
On the subject of wattage, one common power-supply myth holds that higher-wattage power supplies necessarily consume more power. Untrue. All else being equal, a 500-watt power supply won't consume any less power than a 1000-watt unit. That's because a system's components—not its PSU—dictate its power consumption. If you have 300 watts' worth of components in a system, the system will consume 300 watts under load, regardless of whether the system is outfitted with a 500-watt power supply or a 1000-watt one. Again, a PSU’s wattage rating indicates the maximum amount of power the unit can provide to your system’s components, not how much power it consumes from the outlet.
An efficient PSU is a better PSU
A power supply’s efficiency rating is important because higher-efficiency units tend to have better components, waste less power, and generate less heat—all of which contribute to less fan noise. A power supply with an efficiency rating of 80 percent provides 80 percent of its rated wattage as power to your system, while losing the other 20 percent as heat.
Five of 80 Plus's certification levels.
Look for units with “80 Plus” certification. Though the certification process isn't especially stringent, 80 Plus-certified units are confirmed to be at least 80 percent efficient; and 80 Plus has tiers for even more-efficient units, including 80 Plus Bronze, Silver, Gold, Platinum, and Titaniumcertifications. Power supplies in the higher certification tiers tend to command very high prices, however. Average users with average needs should probably stick to the simple 80 Plus or the 80 Plus Bronze level unless they find a particularly juicy deal on a Silver or Gold PSU.
In addition to identifying output power, manufacturers will specify the number of +12V rails their PSUs contain. A “single-rail” power supply has a single, high-power +12V rail for feeding power to hungry system components. A “multi-rail” unit divides its output between two or more +12V rails.
In a single-rail design, all of the power from the supply will be available to any component connected to the unit, regardless of the connector or cable used. In the event of a failure, however, a single-rail power supply has the potential to shoot much more current into your components.
Meanwhile, the main disadvantage of a multi-rail PSU is that it can't share power among the different rails. For example, if you connect 25 amps' worth of components to a +12V rail with a 20-amp maximum rating, the mismatch will trigger an overcurrent protection (OCP) mechanism and shut down, even though other rails my be available with plenty of power to spare. Consequently, with a multi-rail PSU you must pay attention to which components you've plugged in to which rail, a mild nuisance that you don't have to worry about with a single-rail power supply.
On the other hand, that disadvantage becomes a major advantage if you ever encounter a catastrophic failure. The OCP mechanisms in a multi-rail power supply monitor each rail and will shut the whole unit down if they detect an overload on any of the rails. The OCP on single-rail units kicks in only at much higher amperages, which could lead to a major melt-down if a serious overload occurs.
So which is better type of power supply is better—single-rail or multi-rail? Neither, usually. From a performance standpoint, both work equally well; and in general both are very safe to use. If you're building an especially powerful system, though, multi-rail OCP provides an extra layer of safety in case something short-circuits, lessening the odds of frying your costly components during a computing catastrophe.
Cabling: Piecemeal or whole hog?
CORSAIRCorsair's HX850 is a partially modular power supply...
Another consideration is cabling. Power supplies are available with hard-wired cabling, with partially modular cabling, or with fully modular cabling. In modular power supplies, you can add or remove cabling from the PSU as needed to avoid case clutter.
Technically, a power supply with hard-wired cabling is optimal because it requires no additional connections between the unit’s internal PCB and the connector that will ultimately be plugged into one of your components. One end of the cable is soldered into the PSU’s PCB and the other end terminates in a standard connector, with no breaks in the line. Whenever you introduce an additional connection between the PSU and your components—as happens with modular power supplies—you add more resistance and another potential point of failure into the line; and any increase in resistance translates into lost efficiency.
CORSAIR...whereas the AX860i is fully modular.
That said, the additional resistance is normally minimal and not a cause for concern for most users. Meanwhile, modular cabling greatly simplifies keeping the interior of your case nice and clean—just don't connect any superfluous cables to keep the clutter down. Most people prefer modular PSUs, though they cost a bit


 Now,
most of the users try re installing Windows, Intel HD or Nvidia, trying
out different versions, but this gets pretty lengthy and does not
guarantee that the problem will be resolved. And downloading the
different versions, that’s a sort of irritating job. So, today I will
show you how to do overcome this issue, and successfully install the
Nvidia graphics driver without downloading anything else. The process is
a little tricky one, but its sure that it will not be devastating if
you make any mistake. so here is How to : fix the problem of “Nvidia graphics driver can not find compatible graphics hardware“
Now,
most of the users try re installing Windows, Intel HD or Nvidia, trying
out different versions, but this gets pretty lengthy and does not
guarantee that the problem will be resolved. And downloading the
different versions, that’s a sort of irritating job. So, today I will
show you how to do overcome this issue, and successfully install the
Nvidia graphics driver without downloading anything else. The process is
a little tricky one, but its sure that it will not be devastating if
you make any mistake. so here is How to : fix the problem of “Nvidia graphics driver can not find compatible graphics hardware“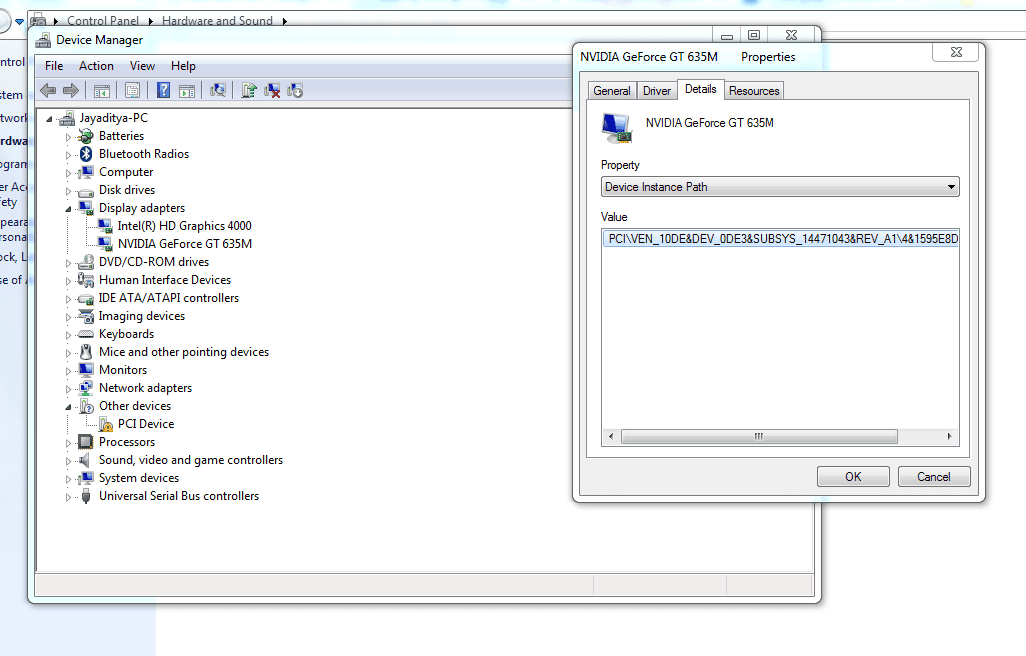


 SILVERSTONE

 CORSAIR
 CORSAIR